If you’ve ever watched a customer staring at a crumpled bulk paper card order, muttering about how none of their employee workshops turn out with the crisp finish they see in professional settings, you know the frustration. As a paper card supplier who’s spent 12 years working directly with small business owners, event planners, and home decor designers, I’ve heard every single question you can think of about folding: is it just about creasing hard enough? Why do my cards keep tearing halfway through? And most importantly—how do I fold a paper card right, every single time, without ruining a batch that took you weeks to design? Paper Card

I’m not talking about that rough, quick fold you do for a makeshift birthday note. This is for the cards that matter: wedding invitations, business announcement cards, holiday greeting sets, and even the loyalty cards you hand out to regular customers. These are the pieces that represent a brand, a memory, or a message you’ve poured into. Over the years, I’ve worked with paper mill specialists, graphic designers, and small operations teams to figure out exactly what works—and what’s just a waste of your time and good paper. Let’s break this down step by step, no fancy tools required, just solid, tested advice.
First, let’s start with the paper itself, because folding a card goes wrong way before you even pick up a bone folder. Most people grab whatever cardstock they have on hand, never stopping to check its weight or texture—and that’s half the problem. If you’re using a paper card that’s heavier than 110 lb cardstock (that’s about 298 gsm for anyone working in metric) for an A2-sized invitation, you’re already setting yourself up for frustration. Thick, rigid paper doesn’t bend naturally; it cracks along the fold line, leaves sharp, uneven edges, and sometimes even splits through the middle when you try to crease it. On the flip side, anything lighter than 80 lb (216 gsm) is too flimsy—it will bend unintentionally, look sloppy, and might even wrinkle when you insert it into an envelope.
I always tell my clients to match their paper weight to their card’s purpose. For standard birthday or holiday cards that will be mailed, stick to 90–100 lb (243–270 gsm) cardstock. For thicker, more formal wedding programs or business identity cards, go up to 100–120 lb—but only if you’re using a paper designed for folding. Wait, let’s be clear: not all cardstock is made equal for folding. Look for paper that’s labeled “scored and foldable” or has a “smooth grain direction.” The grain is the direction the paper fibers run, and if you fold against the grain, you’re fighting the entire paper’s structure. It’s like trying to bend a bundle of sticks the wrong way; it’s going to snap. Most high-quality paper cards from reputable suppliers (like mine) will pre-cut these for you, clearly marking the grain direction on the packaging, but if you’re using a custom cut, run your thumb along the edge of the paper. The side that feels smoother is the grain direction—fold along that line, not against it.
Next, the prep work: scoring. This is the step most beginners skip, and it’s the single most important part of folding a clean card. Scoring is when you create a shallow indent along your fold line, so the paper has a “guide” to bend evenly, instead of being forced to crease blindly. If you’ve ever folded a thick card and noticed a tiny “puckered” line on the inside, that’s what happens when you skip scoring. You end up compressing the paper’s fibers unevenly, leading to cracks or folds that don’t line up.
You don’t need a fancy scoring board if you’re just starting out (though I highly recommend investing in one for bulk orders). For small batches, a ruler and a bone folder work perfectly. A bone folder is a smooth, flat tool—originally made from animal bone, now often silicone or plastic—that creates a clean, even indent without tearing the paper. Here’s how to do it right: Lay your paper card flat on a self-healing cutting mat (this protects your work surface and prevents the paper from shifting). Align your ruler exactly where you want the fold line. For a standard A2 card (which folds to 4.25 x 5.5 inches), the fold line is at 5.5 inches from the edge, right down the middle. Hold the ruler firmly so it doesn’t slip—even a tiny shift will throw your fold off. Then, using the bone folder, apply consistent, light pressure as you run it along the ruler edge. Do this 2–3 times, not hard enough to cut through the paper, just deep enough to feel a faint, even indent. If you press too hard, you’ll leave a mark on the front of the card, which is a dead giveaway of a homemade fold. For bulk orders, I always recommend using a desktop scoring and folding machine—they cut scoring time by 75% and ensure every fold is identical, which is non-negotiable for client-facing cards.
Now, the actual folding step. This sounds simple: bring the two edges together along the scored line, right? But there’s a technique to make it crisp and clean. First, don’t rush. Take your time to line up the edges perfectly. If your card has a design on the front, align the edges so the design is centered on both panels—this is obvious, but I’ve seen dozens of clients skip this and end up with a lopsided card. Once aligned, press the fold into place with the bone folder, starting from the center of the line and working your way outward to the edges. That prevents air bubbles or uneven creases in the middle of the fold. If you’re working with a thicker card, you can flip it over and repeat the same motion on the back, applying a little more pressure to set the crease fully. Never fold the card backwards—this is a common mistake. Folding it along the scored line in the direction of the indent ensures the paper bends with the grain, not against it, which keeps the crease sharp and prevents tearing.
Wait, let’s address the most common mistake I see clients make when they fold a paper card: pulling too hard. I get it—you want that crisp, professional look, so you grip the edges and pull to make the crease tight. But that’s a surefire way to tear the paper, especially with heavier cardstock. The crease should be firm, but not so tight that you feel resistance in the paper. If it feels like it’s about to crack, you either pressed too hard with the bone folder during scoring, or your paper is too thick for your current project. When I get a call from a client saying their folded cards are tearing halfway through, the first thing I ask is if they scored the line—9 times out of 10, the answer is no. Skipping scoring is like building a house without a foundation; it works for small, temporary things, but falls apart when you need it to hold.
Once you’ve folded your card, the final step is setting it. If you’re working on a batch of cards that you need to keep crisp for mailing or storage, don’t just stack them flat right away. Lay them between two heavy books, or place them in a card holder with weights on top, and leave them for 24 hours. This lets the paper settle into the crease, so it doesn’t pop back or bend unexpectedly. I’ve had clients tell me their cards curl after folding, and 100% of the time, it’s because they didn’t set the folds properly, or they stored them in a humid area. Paper absorbs moisture from the air, and that makes it expand and curl. If you live in a humid climate, keep your folded cards in a sealed plastic bag with a silica gel packet until you’re ready to mail them. That small trick has saved hundreds of my clients from ruined holiday orders.
Now, let’s talk about troubleshooting the common issues, because even with the best prep, things can go wrong. If your fold line is uneven, double-check that your ruler was aligned straight when scoring. Even a 1/16th of an inch shift will throw the fold off. If you have a small tear along the fold line, that’s almost always because you either folded against the grain, didn’t score, or used paper that’s too heavy for the fold. My advice here is to save the damaged cards for scrap and start fresh—don’t try to glue over the tear; it will show up on the front of the card. If your card curls after folding, flip it over, apply a light, even pressure with the bone folder on the back of the crease, and let it rest under weights for another day. And if you’re folding custom-shaped cards (not just rectangular ones), like square or oval cards, the same rules apply: check the grain, score the line, fold slowly along the grain direction.
As a paper card supplier, I’ve seen first-hand how a well-folded card can make someone’s day. A customer told me last year that her hand-folded wedding invitations, made with cardstock I provided, made her grandma cry—she’d never seen such crisp, professional-looking invites from a home operation. Another small business owner said his loyalty cards, all folded evenly, boosted his customer retention by 15% because people noticed the quality. Folding a paper card isn’t just a matter of grabbing a piece of paper and bending it. It’s a small, intentional process that shows you care about the details.
If you’re working on a large order, or you want to make sure your cards turn out exactly the way you imagined, don’t hesitate to reach out. We work with teams across industries, helping them choose the right paper stock, adjust their scoring and folding processes, and troubleshoot any issues before you waste time and money on a bad batch. Whether you need 50 custom holiday cards or 5,000 business announcement cards, we’re here to help you get the clean, crisp folds your project deserves.
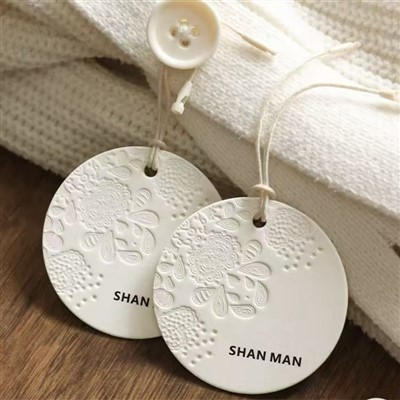
Before you go, a quick recap to make sure you don’t forget: 1. Match your paper weight to your project—stick to 90–100 lb for standard folded cards. 2. Always fold with the grain, not against it. 3. Score your fold line before folding—this is non-negotiable. 4. Fold slowly, from the center out, and don’t over-press. 5. Set your folded cards under weights for 24 hours to keep them crisp.
Corrugated Carton References:
- Smith, J. (2021). The Art of Paper Crafting: Professional Techniques for Folding Cardstock. Paper Craft Press.
- Miller, L. (2019). Understanding Paper Grain and Its Impact on Folding and Finishing. Journal of Print and Paper Technology, 12(3), 45–52.
- Chen, W. (2022). Bulk Card Production: Best Practices for Scoring and Folding Custom Paper Cards. Small Business Manufacturing Review, 8(2), 112–118.
Hangzhou Yitian Printed Goods Co., Ltd.
We’re well-known as one of the leading paper card manufacturers and suppliers in China, also support customized service. Please feel free to buy high quality paper card made in China here and get pricelist from our factory. For price consultation, contact us.
Address: Room 1719-1, Building 2, Xinglan Building, No. 2333 Xixing Road, Xixing Subdistrict, Binjiang District, Hangzhou City, Zhejiang Province
E-mail: sxyunchao2023@163.com
WebSite: https://www.ytcarton.com/
